Florafelt Pocket Panels - Install Guide
Guides: About | Design Ideas | Install Guide | Drip Irrigation Guide
Mounting: Hang On Hooks | Wood Framed | Recirculating | Custom Sizing | Mounting Methods | Mount On Stucco
Specs: Spec Sheets | Architectural Specifications

Make Living Walls Easy
Florafelt Pocket Panels offer the easiest and most budget-friendly way to create a stunning living wall or vertical garden. Please take a moment to read and understand our detailed instructions. We have been successfully using this system for years and have developed the best practices for its use. Designers worldwide have achieved incredible results with this versatile vertical garden solution.
How It Works
The Florafelt Pleated Pocket Water Wicking System is designed to make planting and irrigation easy. The entire system is lightweight, weighing only about five pounds per square foot when planted. You can hang the system using hooks or mount it permanently on a wall.
Easy Irrigation
To water the wall, install drip irrigation or set up a recirculating system with an automatic timer. The felt material wicks moisture directly to the roots while allowing air to circulate, which helps keep the front of the planter dry. Any excess water will drip down to the garden below or to a gutter at the base that directs water neatly to a drain.
The felt becomes a living ecosystem
Plants will grow into the system to create a living ecosystem that just gets better as it grows.

Floraflet Mounting Methods
Florafelt Pocket Panels have a rigid backed coroplast mounting surface that can be mounted in many ways.
Hang from Tabs (easy)
The panels come with nylon tabs at each corner so they can be hung on hooks, nails, deck screws, or even chains and carabiners. Set hooks or mounts 24 inches apart vertically. This will allow the panels to shingle which allows the water to flow downward nearly to a gutter below. Easy removal allows for seasonal planting, winter storage, or non-permanent fixture installation for building code requirements.
See: Hang On Hooks

Use hooks to hang from the Florafelt Pocket Panel mounting tabs.

Florafelt Pocket Panel hangs from mounting tabs.


Mount on Plywood (permanent)
The most permanent method for mounting is to use smooth coated deck screws that connect the panels to a sturdy plywood surface.

Chris Bribach, inventor of Florafelt, installs Florafelt Pockets Panels.
1. Provide a plywood mounting surface
Use standard stud framing to provide a sturdy mounting surface. Provide air gap spacing if you plant to mount over drywall. Check with your local building codes for allowable distances.
2. Waterproof the plywood surface
Florafelt Pocket Panels have a rigid backing that keeps moisture away from the walls however they do not provide full protection. Small drips may find their way behind the wall over their life so it is very important to provide a waterproofed surface for permanently mounted panels. Choose a waterproofing system that is best for your situation.
Sheet-Based Membranes: These are pre-formed sheets made of materials like modified bitumen, HDPE, or PVC.
Fluid-Applied Membranes: These are liquid coatings (e.g., rubberized asphalt) that are sprayed or rolled onto the wall.

Florafelt Pocket Panel plywood installation deatil.
3. Measure and mark the wall
Use our standard panel sizes to mark up the wall to create a consistent and predictable layout.
Custom Trimmed Panels: Panels can be custom trimmed for custom sizes, angles or curves. Use a box cutter to cut the rigid backing and heavy duty construction scissors to cut the Florafelt pockets. Reconnect loose felt by adding additional deck screws.
4. Attach panels with smooth coated deck screws
Use smooth coated deck screws at each corner placed in the staple indents at the top pocket fold.
Recommended screw location:
1 inch from the sides.
2 inches from the top and bottom.
Add additional screws for windy areas.
For extreme conditions, add screws ½ inch below the top fold of each pocket edge.
Do not over-tighten, keep screws at the felt line so they can be easily removed. A gentle hold will maintain an air gap between the panel and waterproofing surface. Screw heads that are buried into the felt are very difficult to remove.

Florafelt Pocket Panel screw mounting locations.
Recommended Fastener: Grip-Rite – 8 x 1-5/8 inch Philips Bugle-Head Coarse Thread Sharp Point Polymer Coated Exterior Screw – Home Depot
Always use smooth coated screws (recommended above)
Textured or self-tapping screws will bind with the Florafelt

5. Pull the top flap outward
When stacking the panels it is important to bring the top fold outward so the water dripping from the bottom of the panel above will be captured by the top fold and directed back into the panel below.
Direct water back into the wall
Pull the top flap outward.
Position the bottom of the panel behind the flap.

Florafelt Pocket Panel showing the top flap positioned outward to direct water flow.
6. Stretch Open The Pockets
Before you plant, stretch open all the pockets using a small pipe or tool handle to get leverage.
Use a tool to stretch pockets open
Pull firmly but not excessively.
The felt pocket will stretch to about 2 ½ inches out.

Florafelt Pocket Panels being stretched open using a tool.
Irrigation
The Florafelt Pocket Panel system uses minimal soil, so it must be watered frequently depending on the exposure and types of plants used. It’s important to note that because water moves through the system, watering more frequently for shorter periods will conserve water. The frequency of watering will vary depending on the situation and type of plants.
Drip Irrigation Systems
Automatic irrigation is highly recommended for the Florafelt Pocket Panel system. Living walls require frequent irrigation cycles therefore hand watering will rarely provide good results.
Battery Operated Hose Timers provide reliable irrigation and can be set to frequent cycles hourly or set times depending on the type of unit.
Irrigation controllers connected to valves on centralized systems require an independent ‘zone’ for the living wall. Make special notes near the controller unit highlighting the living wall timing requirements to prevent others adjusting the living wall settings.
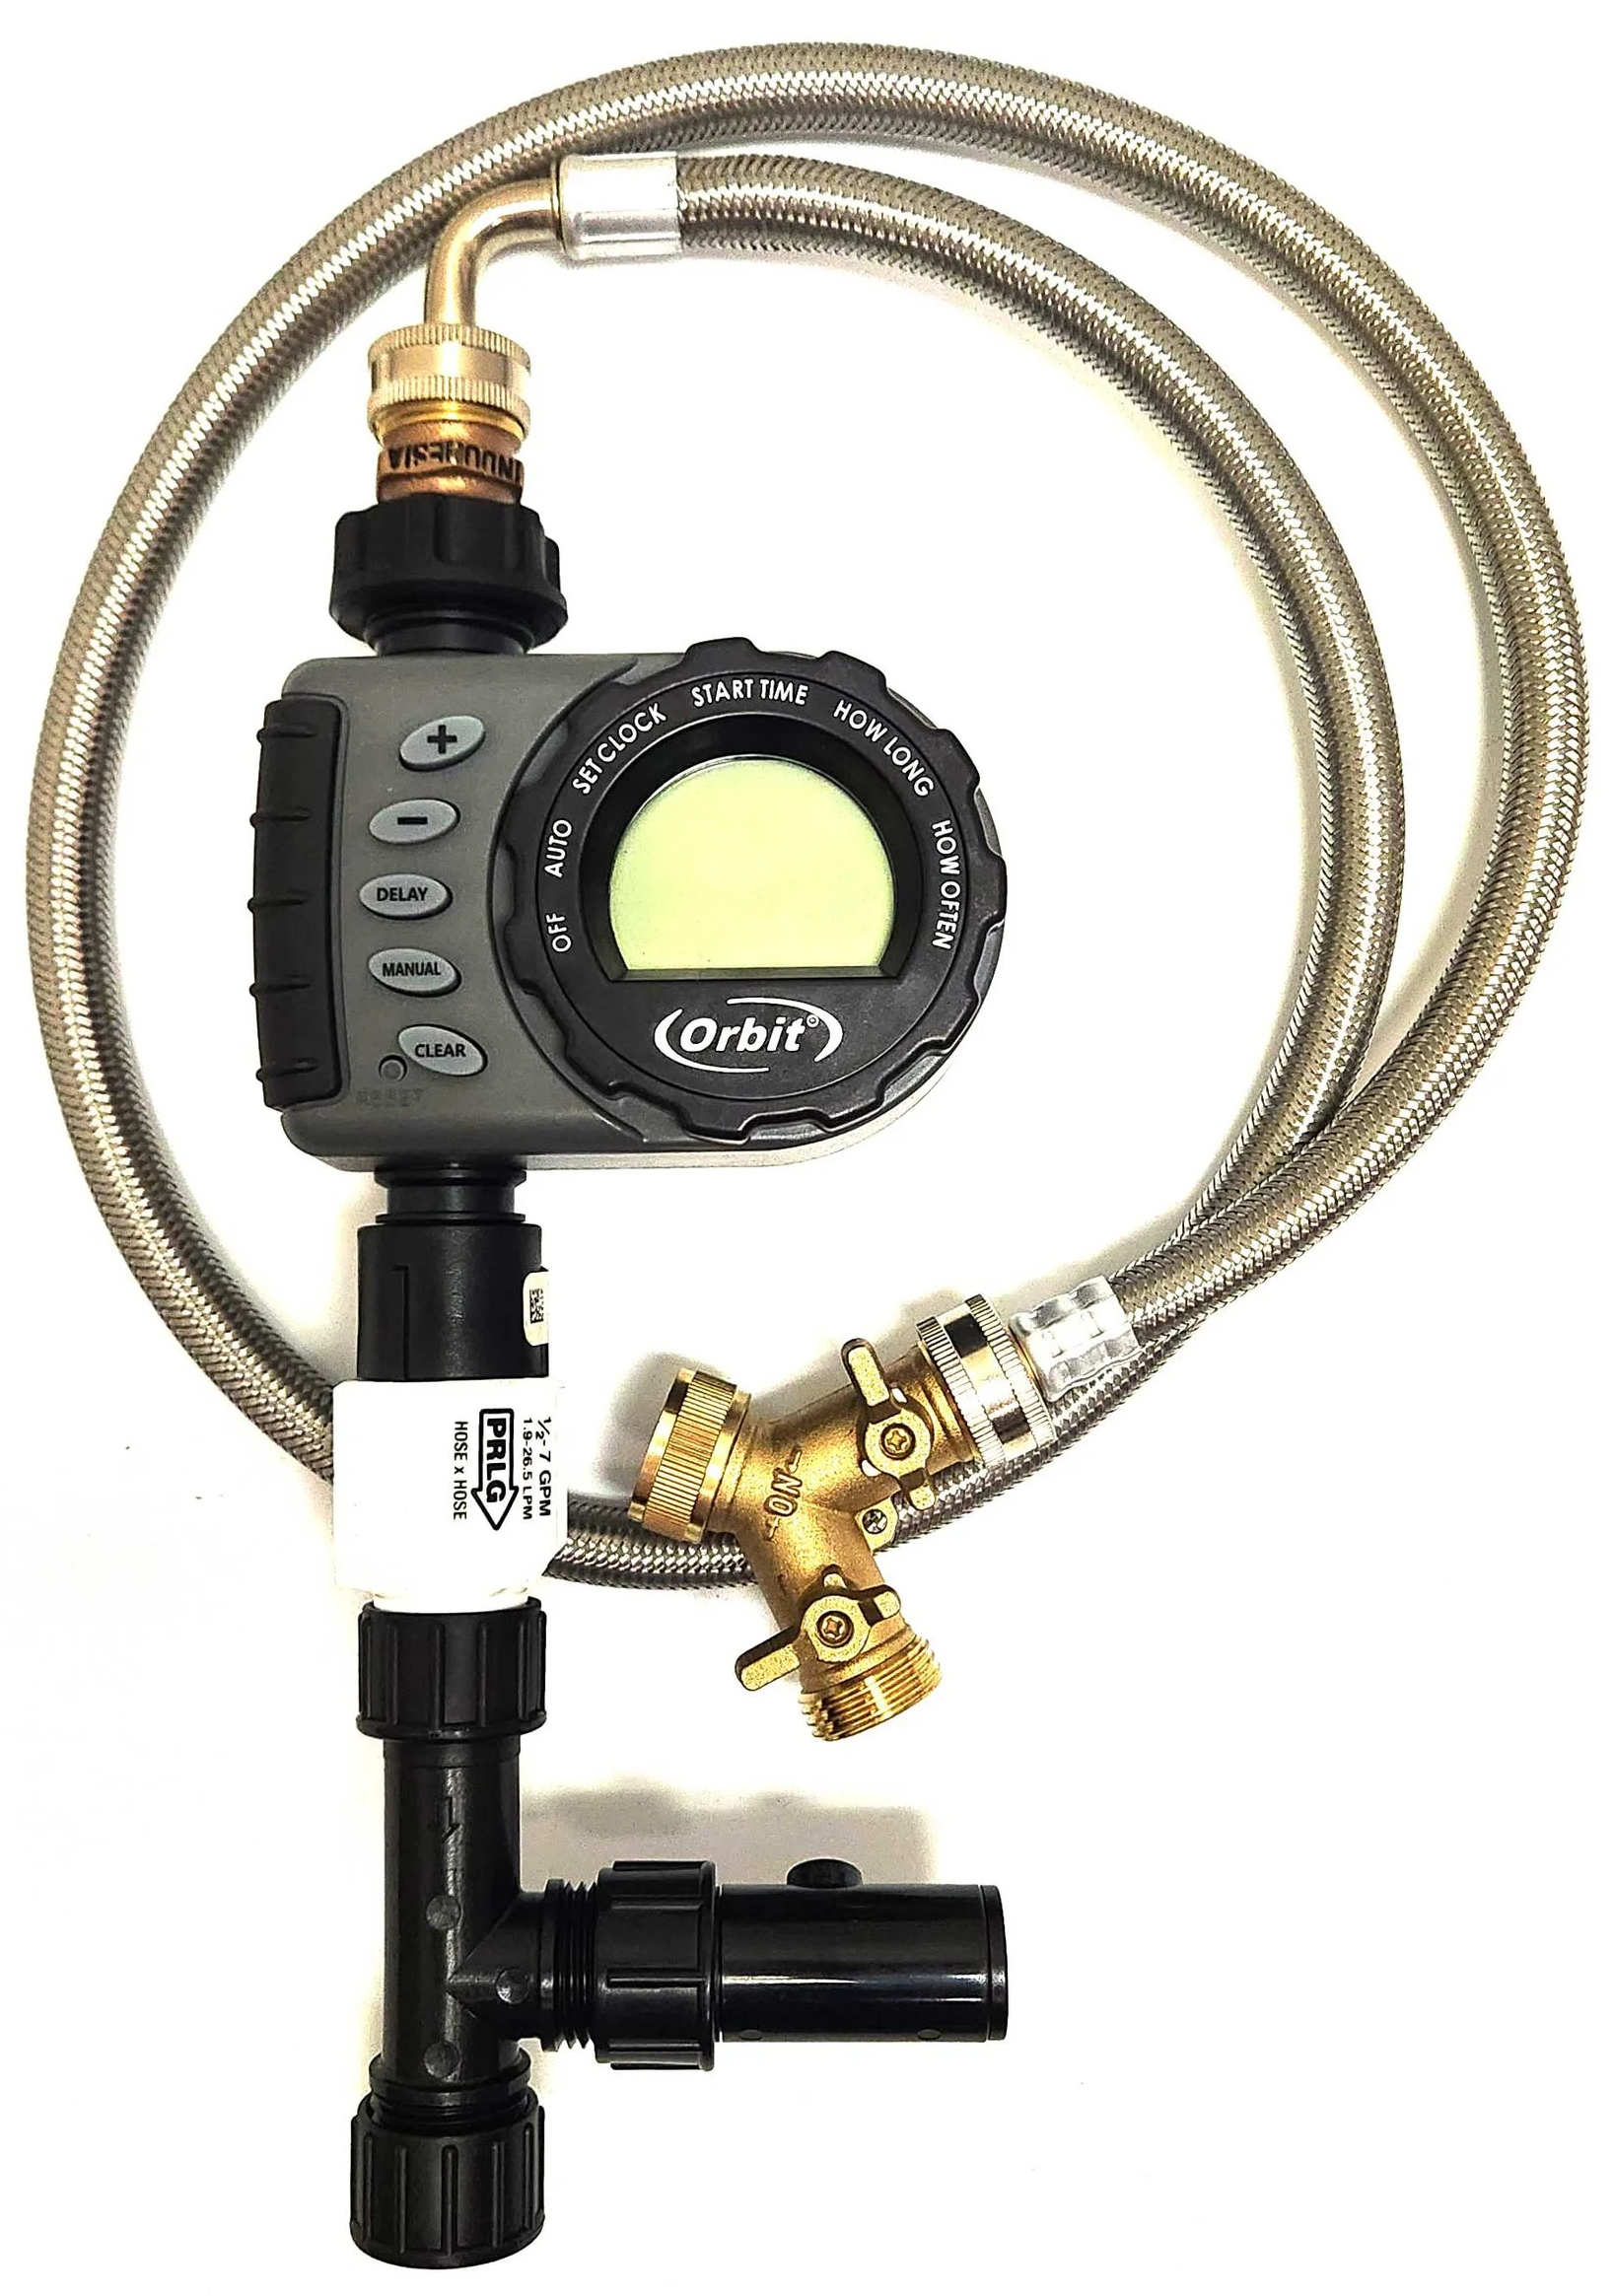
Florafelt Drip Irrigation Kit
Drip tubing and emitters
Drip irrigation tubing should be located on the top row only for Florafelt systems. Water wicks downward to all the pockets typically favoring the lower pockets.
Provide two drip emitters per pocket.
Locate drip emitters 1-1/2 inches from the stapled midpoint of each pocket edge.
Do not water the top plant directly. Moisture wicks up from the bottom fold for each plant.
Use Zip Ties to attach the irrigation tubing to the top row.
There is a gap just under each staple.
Poke a zip tie through this gap.
Tie down the tubing at each intersection.

Florafelt Pocket Panel drip emitter locations.

Use Zip Ties to attach the irrigation tubing to the top row of pockets.
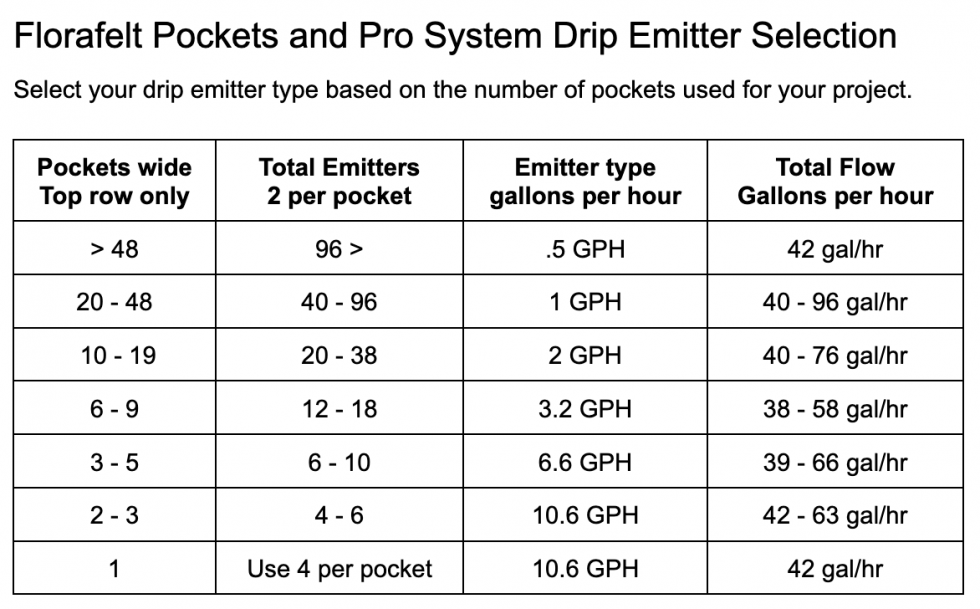
Size drip emitters for adequate flow
Pressure regulators in the system require a minimum flow to operate correctly. This insures the pressure does not build up and blow out your emitters.
Use the chart to select the right emitter for your project
Choose emitters with flow ratings that together provide adequate flow for correct operation of your systems pressure regulator.
Timer Setting Recommendations
Set soak and cycle as follows:
Exterior full sun: Every 2 hours for 4min.
Exterior shade: Every 2 hours for 1 min.
Interior bright light: Every 24 hours for 4 min.
Interior low light: Every 24 hours for 1 min.
Test the soil by touch and make adjustments to timing cycles as required.
Soggy soil: Maintain water frequency, reduce water duration by 1/2.
Dry soil: Maintain water frequency, increase water duration 2 times.
Observe weekly or monthly to make adjustments.
Do not use rain delays: Walls receive very little moisture during rains.
Use automated weather adjusted systems if available.
Drain Trays
For outdoor gardens located where water can drip directly into the garden consider adding a French drain or rock bed to receive runoff. This will help to prevent flooding in the garden below.
In areas that must remain dry, install a drain tray or gutter at the base to capture the runoff and direct it to a floor drain or sewer connection. We offer gutter solutions that you can connect to a standard garden hose.
For new construction, specify a gutter drain below the wall and slope floors toward the drain to catch potential water that may splash from the wall.

Florafelt Pocket Panel with Slimline Drain Tray.
Check irrigation and water flow before planting
Before planting, check for successful operation of the irrigation system. Confirm even flow in the system by checking inside the pockets. Moisture should collect at the bottom fold of each pocket, while the front face of the pockets will remain dry.
The newly planted wall will require constant irrigation so make sure all irrigation and drainage is fully functional before adding plant materials.
New construction projects should wait to plant until water systems are fully operational.
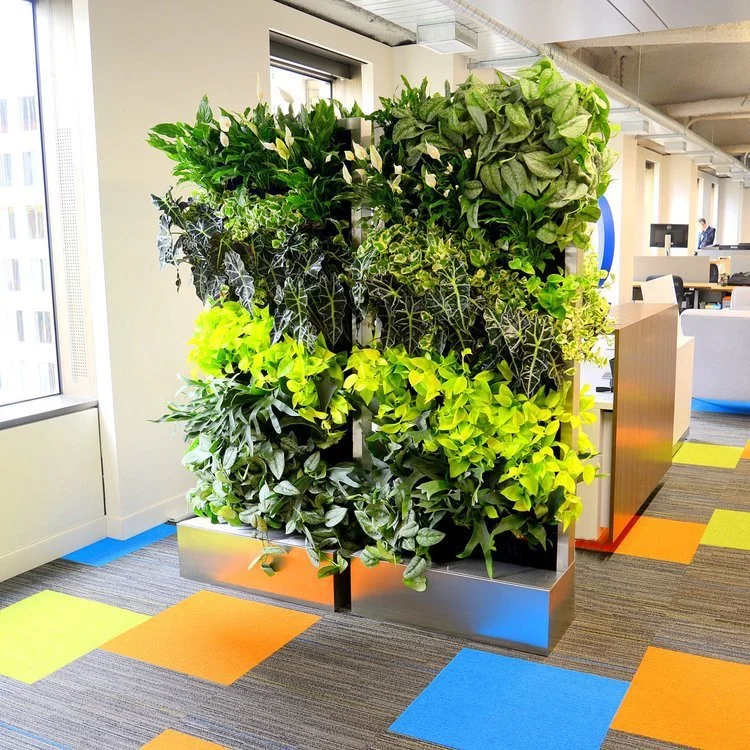
Recirculating Systems
Living walls without access to a drain require a self-contained system. These systems use tanks to store water and a pump to circulate it. Water is pumped to the top of the wall then flows through the felt pockets collecting in the tanks. The system is controlled by a grounded 110V timer set to optimize moisture levels. A gutter can be added to direct water to a vessel or hidden tank.


Florafelt Pocket Panel custom recirculating installation by Planted Design.
Florafelt Recirc Systems
We offer quality built aluminum powder-coated units that are lightweight, modular, and ready to plant.
Florafelt Recirc 33-FS Free standing living wall units.
Planting
Choosing Plants
Select plants suited to the environment
Select plants for your environment and create an arrangement that not only looks beautiful but also places plants in their ‘happy place’. Research water needs and sun requirements for each species to create a living ecosystem that will thrive for years to come. Your living wall will grow in and evolve to become a living healing experience.
4-inch potted plants fit perfectly
Typically use 4 inch potted plants that will grow into the wall or 6 inch potted plants with soil removed to create an instant filled in look. Be creative with your combinations or start with just soil and plant your wall with seeds and cuttings.

Florafelt Pocket Panels being planted at the San Francisco Conservatory of Flowers.
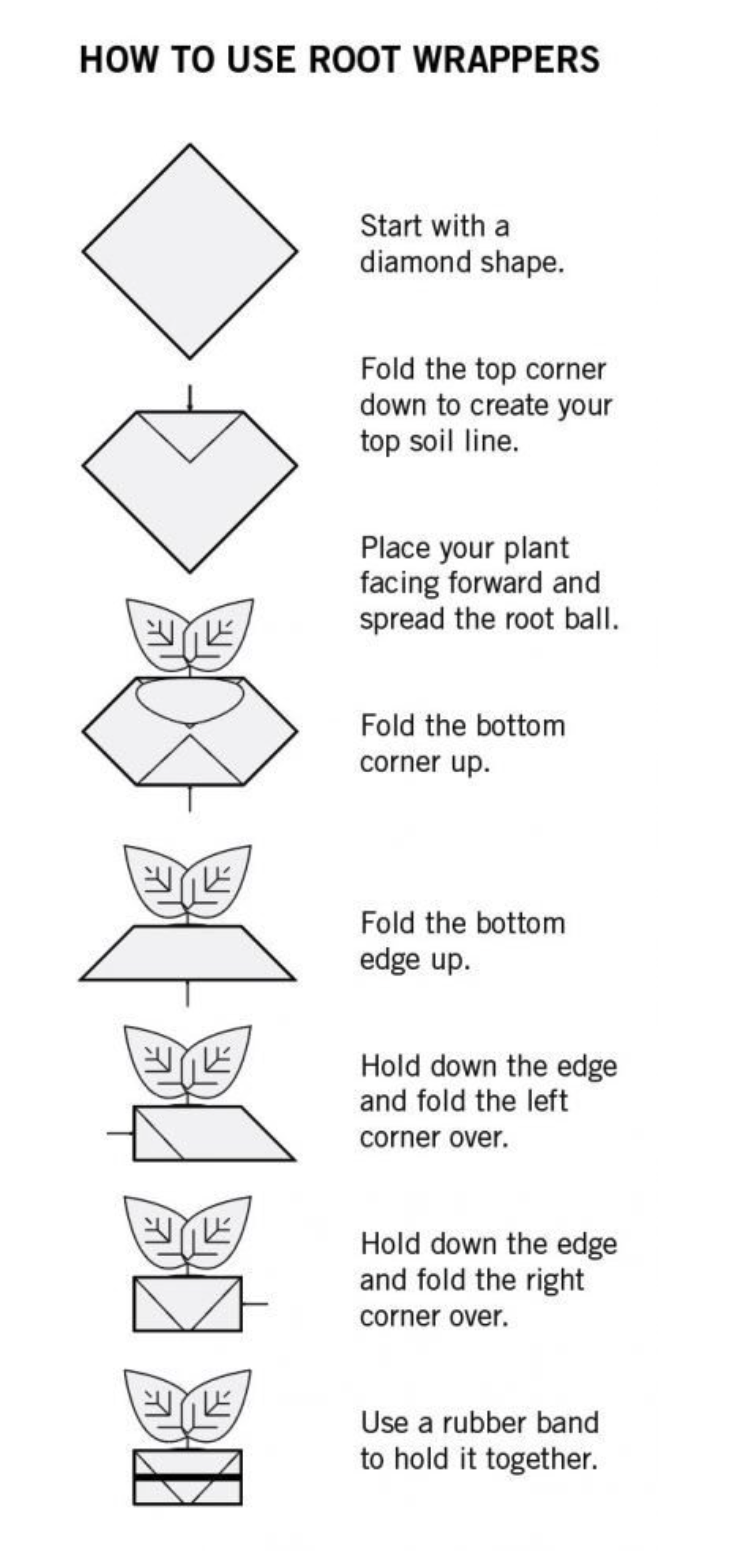
Florafelt Root Wraps
An essential part of the Florafelt system are the Root Wraps. They are a very thin version of the same water-wicking materials as the Pocket Panels and ensure the roots grow through and into the living wall system. Root Wraps make plant handling and change out easy while holding the soil together to prevent air gaps. They can be cleaned and reused or you can order fresh new ones.

Florafelt Root Wrapped plant with many plants grouped together.

Florafelt Wrapped plant removed from a living wall and showing roots.
Do not add soil directly to the pockets
Adding soil directly to the pockets is messy and makes it difficult to remove plants. Root Wraps ensure the small hydroponic roots will emerge from the wrap then tap into the moist felt making it easy to change and rearrange your planting design.
Insert plant with folds facing front
Make sure the folded parts of the wrapped plant face outward and toward you. It’s very important to have the single layer of felt touching the back layer of the pocket to receive proper moisture contact.
Push the plant firmly into the pocket
Moisture collects at the bottom of each fold. Seat each root-wrapped plant firmly in each pocket so it makes full contact with the bottom fold.

Florafelt Root Wrapped planting arrangement by Jamie Sangar.
Change and Rearrange
Plants can be removed and changed. Mature plants attach themselves to the felt by their roots but can still be removed if required. Small hair like roots can be broken and moved if necessary. This small root disturbance will not harm the plant.
Feeding
After 6 months, the soil in the wall will begin to lose its nutrients. Depending on the plant choices, the natural decay within the wall can reach a balance. However, in most cases, the plants will prefer to be fed. We recommend using water-soluble fertilizers.
Water Soluble Plant Food
We recommend Jack’s All Purpose Plant Food 20:20:20 or similar. Use very light concentrations.
Do not over-feed as this will cause the leaves to emit sugars that attract insects and cause plants to grow too quickly. Feed only in spring and summer because plants go dormant in fall and winter.

Manual feeding
Feed your living walls monthly in spring and summer months.
Use a pressure sprayer with a dilute amount of water soluble fertilizer to spray the foliage and soil.
Add plant food spikes or tea bags filled with granular fertilizer to the top pockets directly beneath the drip emitters.
Plant Food Injector
A simple pressurized bottle feeder is silent and simple. With each irrigation cycle the bottle expands and contracts to add trace amounts of plant food into the wall, then produces concentration to provide a rinse cycle. See our irrigation products to learn more about our Plant Food Injector.

Florafelt Plant Food Injector
Recirculating Systems
Add a teaspoon of water-soluble fertilizer to your plant's water tank once a month. A light feeding is ideal for most indoor plants.
Share your project
Tell us about your inspiration and why you decided to have a living wall in your life. Let us know your success and struggles. This will help us learn how we can make a better experience for you.
We Will Promote You
We love to promote our professional installers! Send us your installation, finished photos, and videos of your experience so we can share your story on our blog and social sites to help build your business.