Florafelt Moisture Sensor Setup Guide
Products | Drip Irrigation Guide | Recirculating Irrigation Guide | Pump Maintenance | Moisture Sensor Setup | Woods Timer | Slimline Drain Tray Joining | Plant Food Injector Guide
Florafelt Moisture Sensor
The Florafelt Moisture Sensor is designed to work perfectly with the Florafelt Pocket and Pro Living Wall Systems. Our unit uses the Govee WIFI humidity sensor with an extension tube designed to fit over the unit. If you’re handy you can configure a similar setup on your own, or we provide the assembled unit ready-to-use. here

Insert into Florafelt Pockets and Pro System to track moisture levels in your living walls. Monitors living wall pocket moisture and provides alerts for potential dry-outs.

Insert in pocket beside a plant.

Place it in the 2nd row down from the top.
How To Install
To install the unit in your Florafelt System, insert the sensor into the side edge of a pocket to take a reading from the bottom fold where moisture collects. Do not insert into the soil. Place the sensor next to the wrapped plant so it makes contact with the bottom fold of the pocket.
Locate the Sensor in the middle of the living wall and in the 2nd row of the wall. This will provide a reading that will warn you if the wall begins to dry out due to accidental irrigation problems. Avoid the top row so it does not become soaked with the irrigation system.
Observation of the readings from the sensor phone app will help you to adjust your irrigation settings to optimize your living walls overall health.
Helpful tips
Always use in 2nd row down pocket to get the most timely reading for dry outs.
For large walls locate in the center so it’s easy to find it.
In the Pro system locate it between the grids so the tube extends down into the system.
For the bag cover we provide a watertight plastic bag and a rubber band.
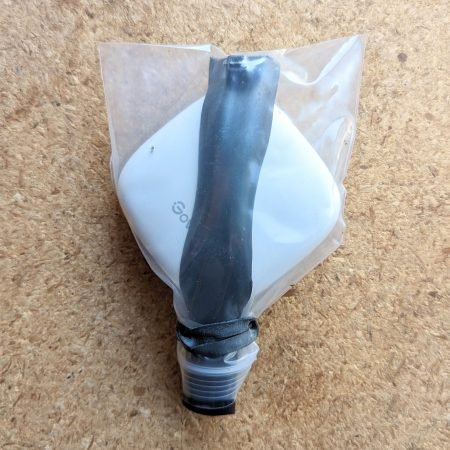
Florafelt Govee Humidity Sensor Cover
Protect the Unit from Water Exposure
The electronic unit itself is not waterproof. Use a watertight plastic bag to protect the unit from exposure to water and make secure with a rubber band.
Use a felt cover to hide it in the wall
Use a felt wrap to completely hide the device in your wall.

Place it at the bottom of the felt circle.

Fold the top town.

Fold in the sides.

Wrap it up and secure with a rubber band.
Install the Govee Phone App
The Govee WIFI Sensor is controlled completely by the Govee phone app.
Upload the app to your phone.
Get the Govee App : Google Play & Apple App Store
How to Activate and Connect the Govee Sensor
The units require 2.4 GHz Wi-Fi connection.
Set your router’s wifi settings to have both 5 GHz or 2.4 GHz.

Remove the Battery Pull Tab.
You may need to remove the protective coverings to access the battery pull tab.

Open the Govee App.
Click on the plus icon.

Click on the Bluetooth Icon.
Click on Home Improvement.
Scroll to locate the Wi-Fi Thermo-Hygrometer.

When your device appears, select it.
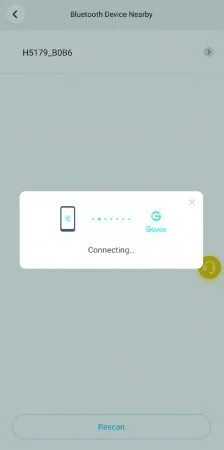
You will see ‘Connecting’ as the device connects.
The Govee sensor unit requires 2.4
GHz Wi-Fi connection.
Check your router’s wifi settings to make sure 2.4 GHz is active.

Name your new device.
Select 1 hour interval for maximum battery life.
Click Done.

Locate your WIFI network.
Enter your WIFI network password.
Save password if you plan on adding other devices.
Click Done.

Turn on Device Safety so others can’t accidently connect to your device.

Set a lower limit humidity alarm to warn of potential dryouts. Adjust to reduce excessive notifications as the humidity varies over time.
Turn on Alert Me to get notifications on your phone.
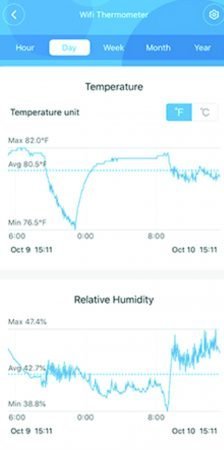
Watch for Trends and Make Adjustments
Observe humidity readings over weeks or months, and make adjustments to your irrigation as required.

How to change the batteries
Slide sensor from extension tube.
Open back panel.
Uses 3 AAA batteries, included in the unit.