Florafelt Compact Living Wall Kit Instructions
Parts Included in Your Florafelt Compact Kit
Florafelt 8-Pocket Panel - Comes folded; has the water tube attached.
3-gallon tank - Placed below the panel to catch drips from the panel and recycle water for irrigation. Top off tank weekly or as required.
Water pump - Includes a 6' cord; pumps water up the tube.
Timer - 110v grounded, for interior use only.
Wall Mollies - Screw directly into drywall with a Phillips screwdriver.
2 - L-hooks - Screw into the mollies. For wood surfaces, pre-drill ⅛ inch holes and screw in by hand.
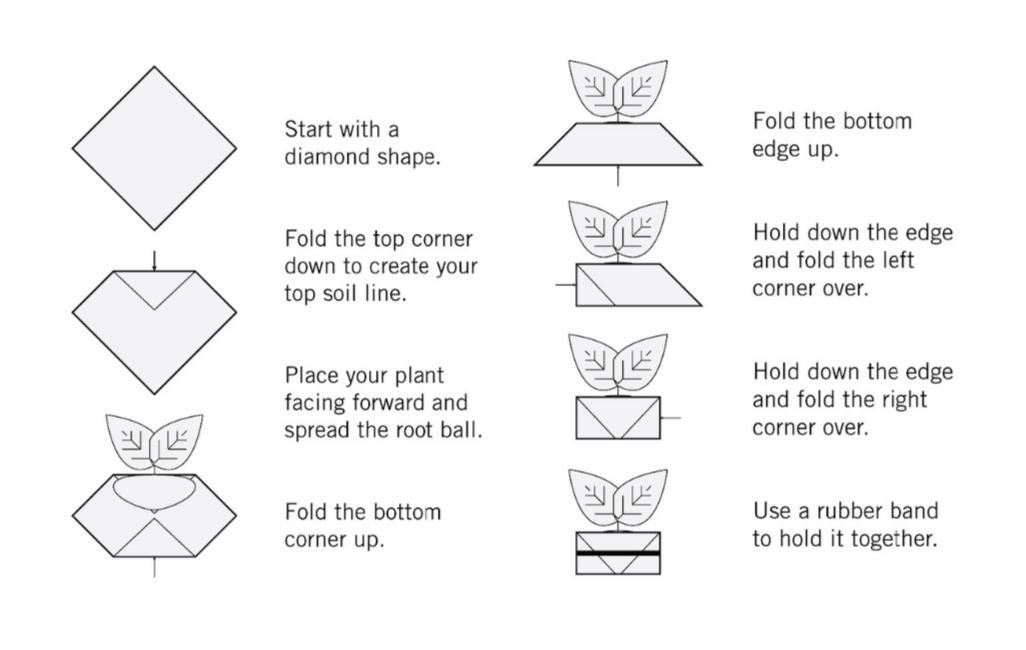
8 - Florafelt Root Wrappers - Provided for each pocket; required for planting. Use the folding method shown above. Do not put soil directly into the pockets.
8 - Rubber bands - Used to secure the Root Wrappers.
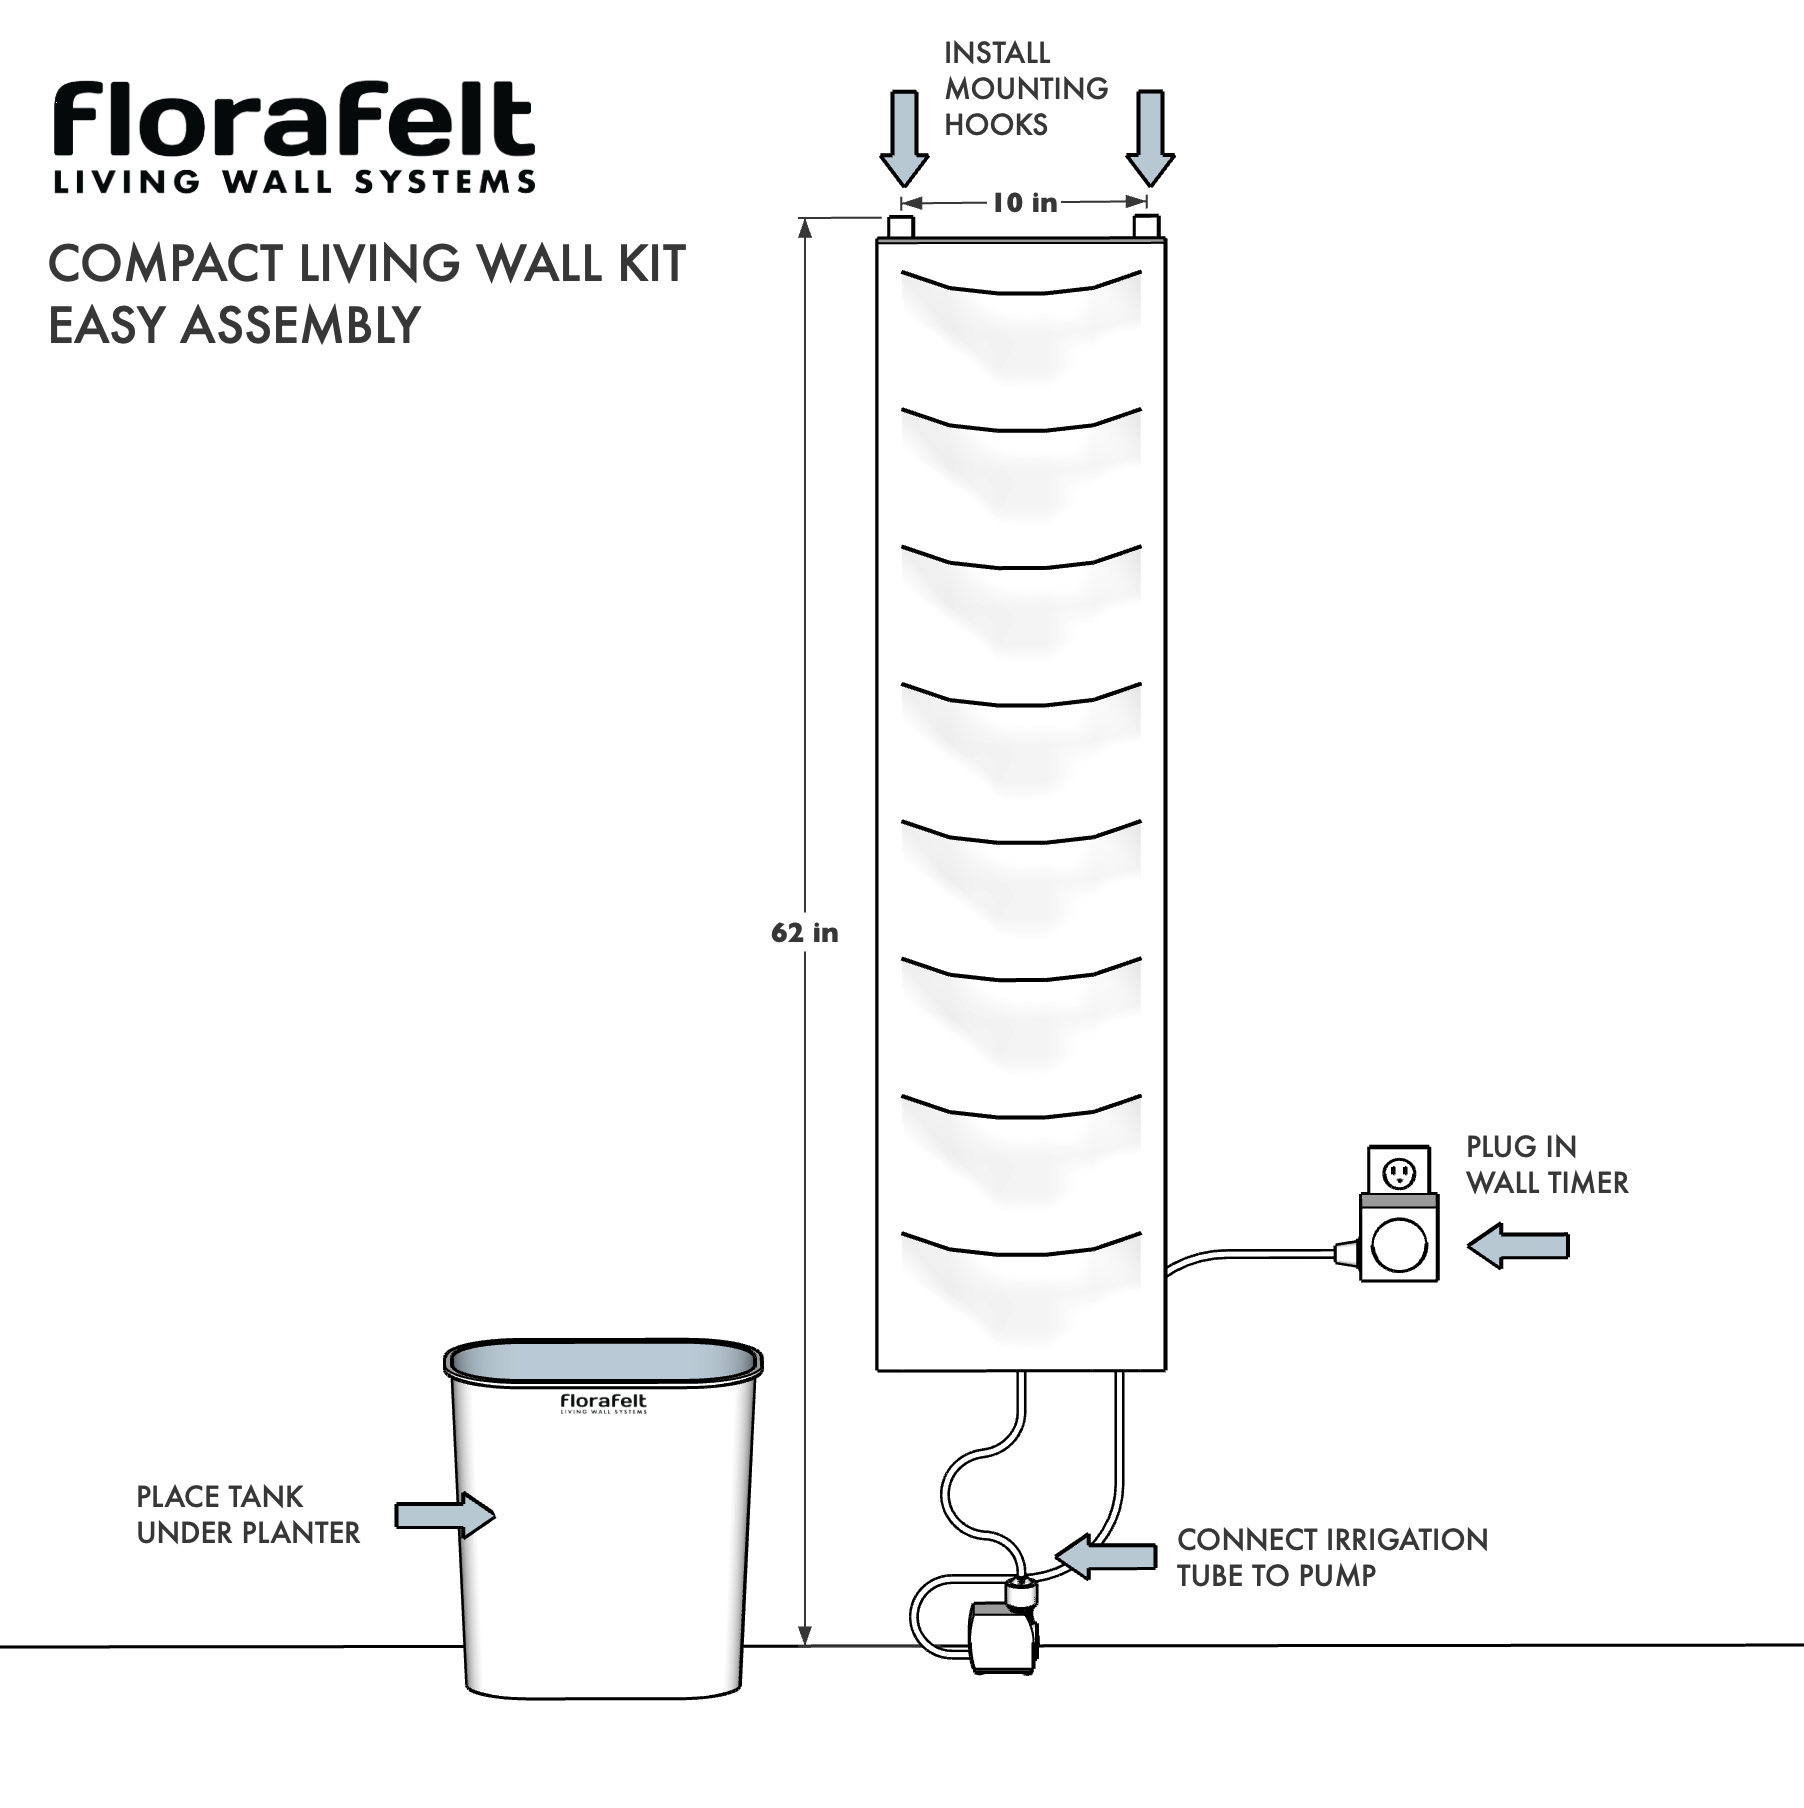
Easy Setup Guide
Hang: Use the nylon tabs to hang the pocket panel from L-hooks.
Connect: Plug the water pump into the water tube that is already attached to the pocket panel.
Place: Position the water tank beneath the panel so the bottom of the pocket panel is inside the tank by an inch or two.
Fill the tank with water: Just below the bottom edge of the panel.
Set the timer: Start at 1 minute per day indoors and 5 minutes per day outdoors - adjust as needed.
Plant your wall: Use root wraps, making sure to insert the wrapped plants with the smooth side against the wall and the folded side facing toward the front.
Key Details for a Perfect Setup
Wall Mounting: Locate the wall mount hooks 10" apart and 62" up from the floor.
Water Recirculation: It is crucial that the bottom of the felt pocket panel is inside the tank to ensure water drips into the tank and not on your floor.
Lighting and location: Choose a location with adequate light for your plants. If required, add supplemental grow lights.
See: https://florafelt.com/florafelt-lighting-guide.
How to use Florafelt Root Wrappers
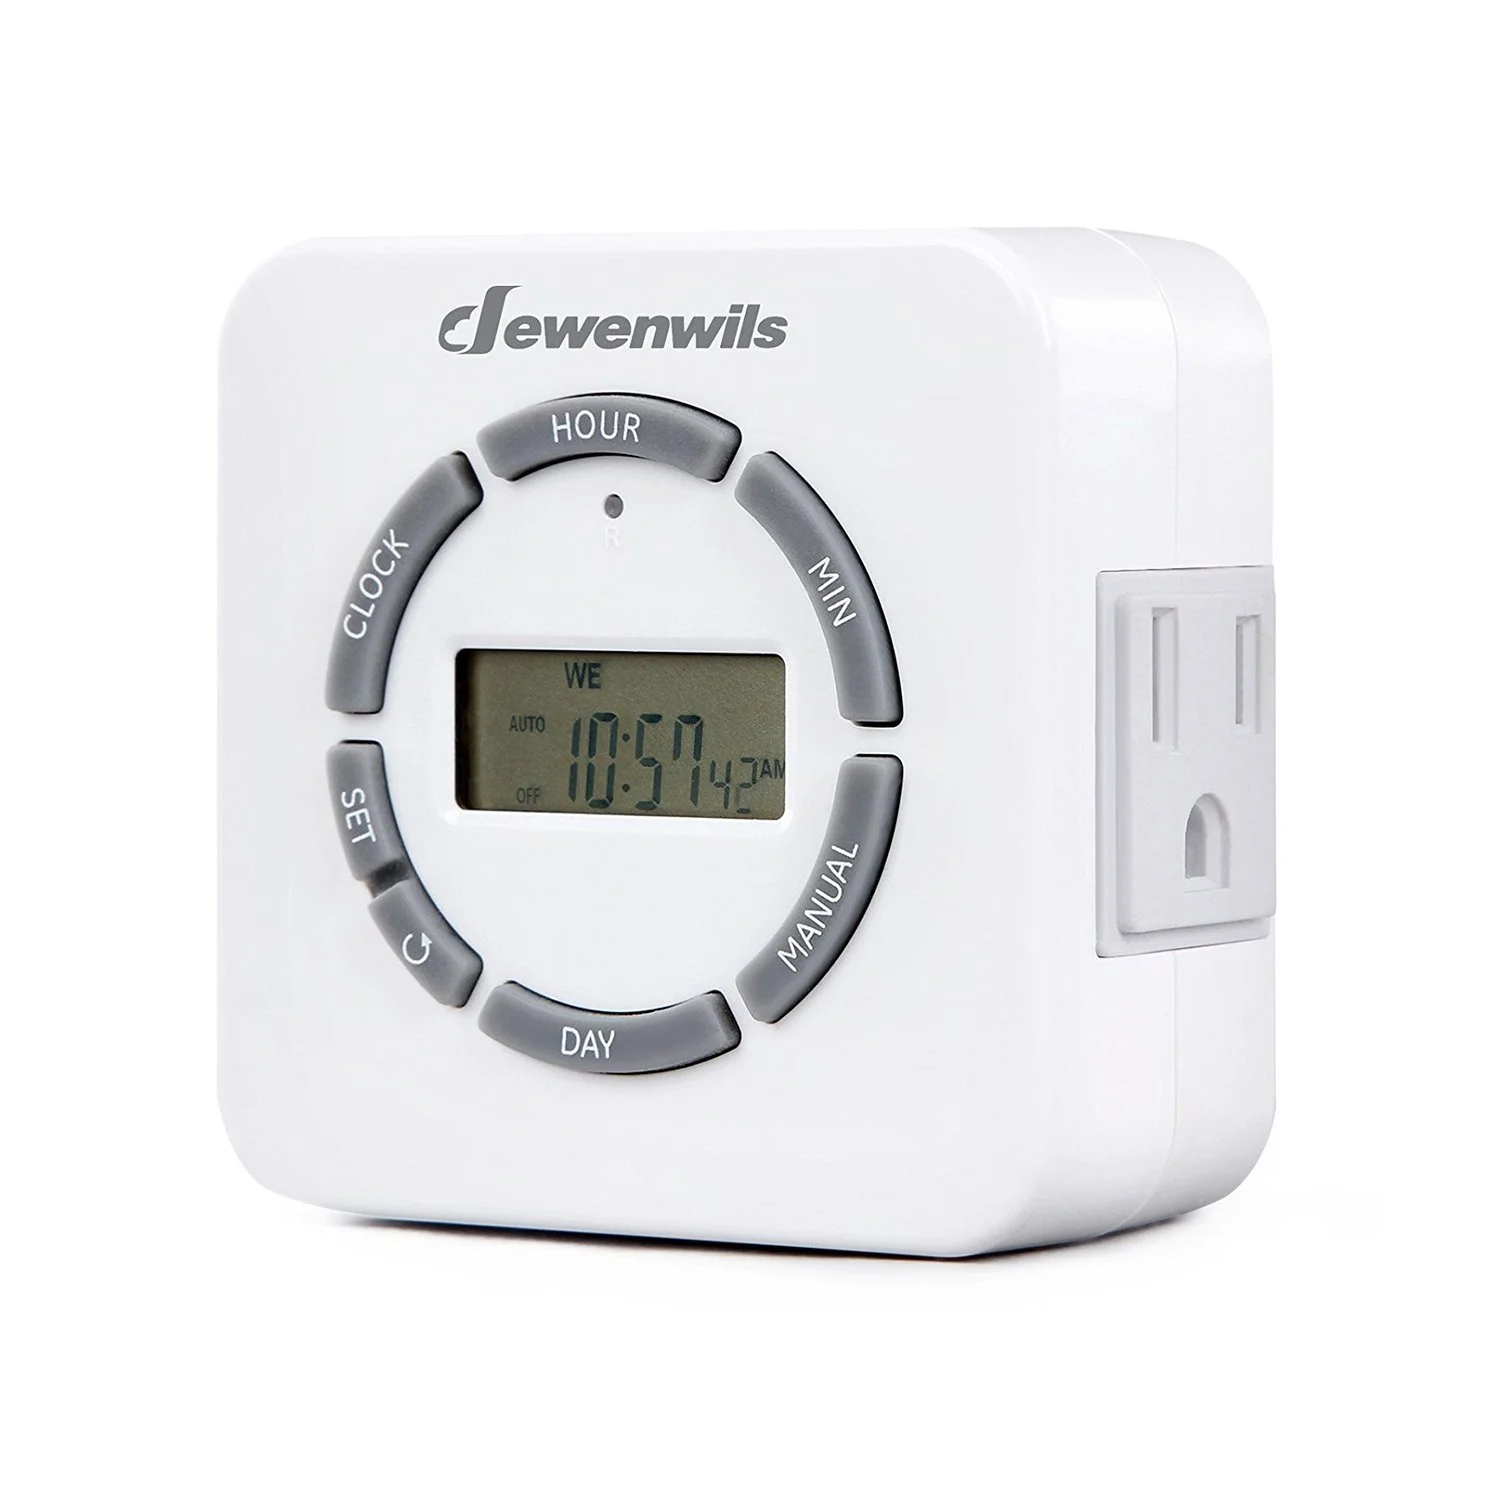
How to Program the Included Digital Timer
1. Initial Setup & Reset
Before you start clicking buttons, the timer needs a "brain wash" to ensure no old programs are interfering.
Plug it in: Plug the timer into a wall outlet for at least 30 minutes to charge the internal battery.
The Reset: Use a paperclip or pen to press the small "R" button (reset hole) located just below the HOUR button. The screen should clear and then show 12:00.
2. Set the Current Time
The timer needs to know what time it is right now before it can follow a schedule.
Press and hold the CLOCK button.
While holding CLOCK, tap DAY to select the correct day of the week.
While holding CLOCK, tap HOUR and MIN to set the current time.
Note: Ensure you pay attention to the AM/PM indicator on the screen.
Release the CLOCK button. The time is now set.
3. Programming Your "ON/OFF" Schedule
You can set up to 20 different programs. Here is how to set the first one:
Enter Programming: Press the SET button once. You will see 1 ON on the display.
Set "ON" Time: * Press DAY to choose which days you want this setting active (e.g., all week, just weekends, etc.).
Press HOUR and MIN to set the time you want the device to turn ON.
Set "OFF" Time: Press SET again. You will see 1 OFF on the display.
Repeat the steps: Press DAY, HOUR, and MIN to set the time you want the device to turn OFF.
Finish & Exit: Press the CLOCK button to save your settings and return to the main display.
Pro Tip: If you want to clear a specific program you just made, press the Reset/Recall button (the arrow circle symbol) while in the programming screen.
Recommended Settings for the Florafelt Compact Kit
Indoors - 1 minute per day. Example: 12:00pm - ON, 12:01pm - OFF
Outdoors - 5 minutes per day. Example: 12:00pm - ON, 12:05pm - OFF
Adjust to your conditions and skip days if required.
Do not allow the soil to remain too damp.
4. The Final Step: Activation Mode
This is where most people get stuck. The timer must be in the correct "Mode" to follow your program. Press the MANUAL button to toggle between these settings:
ON: The outlet stays on permanently.
OFF: The outlet stays off permanently.
AUTO ON / AUTO OFF: This is what you want!
Set it to AUTO OFF if the current time is outside your scheduled "ON" window.
Set it to AUTO ON if the current time is inside your scheduled "ON" window.