FLORAFELT POCKET PANELS SPECIFICATIONS
DOWNLOAD PDF
Overview
Panel Specifications (The "Hardware")
Specify the exact Florafelt model and its physical properties.
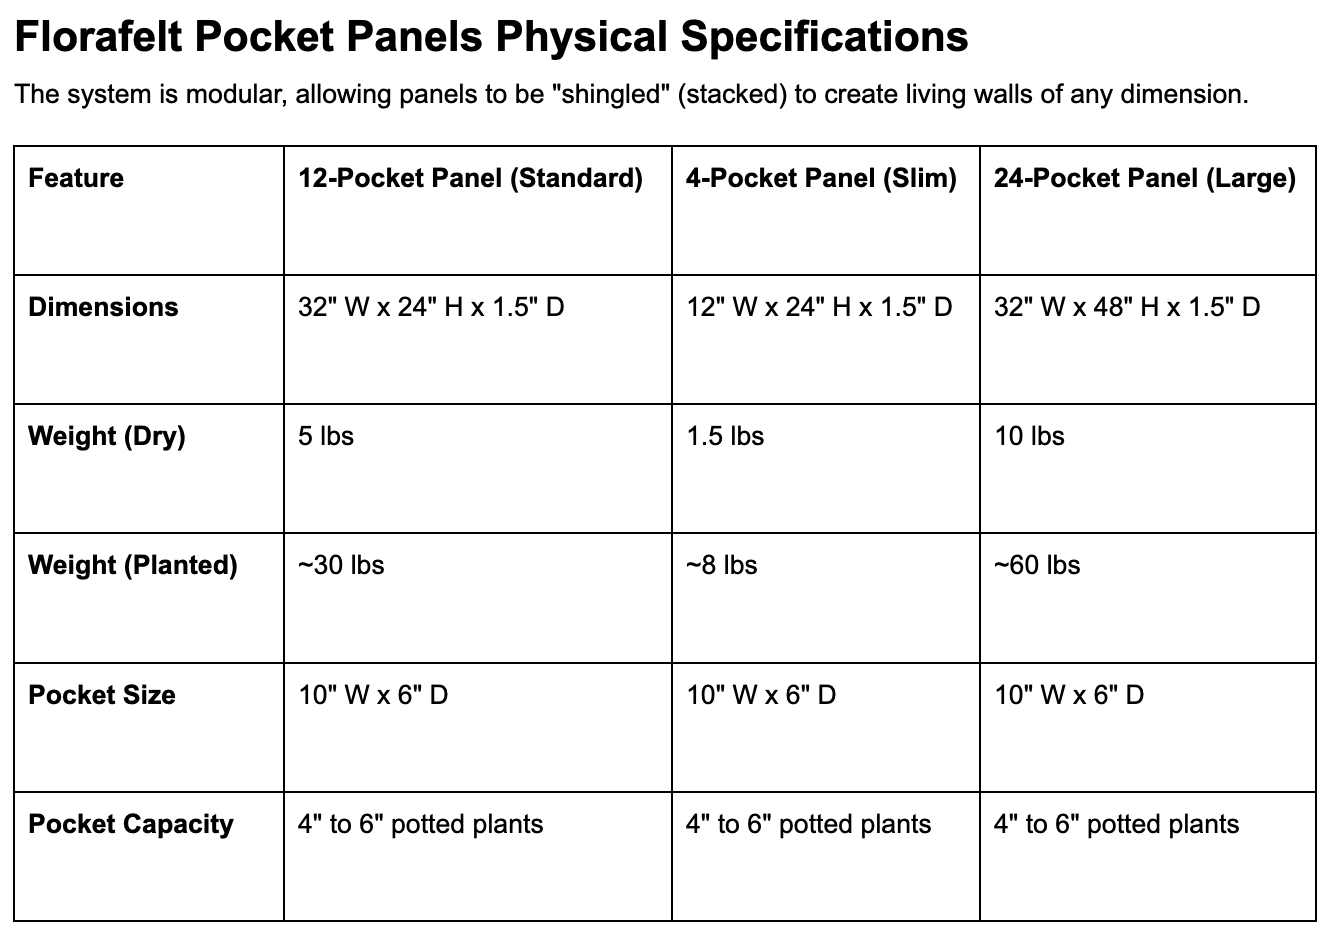
Model Identification: e.g., F12 (12-Pocket, 32" x 24") or F4 (4-Pocket, 12" x 24").
Material: 100% Recycled PET non-toxic synthetic felt stapled to a rigid HDPE (Coroplast) backing board.
Weight Loads: Specify the dry weight (~5 lbs per panel) vs. the fully planted/saturated weight (~30 lbs per F12 panel). This is critical for structural engineering.
Root Wraps: Include the quantity of 10" x 10" root wrappers needed per pocket.
The Mounting & Waterproofing Detail
The biggest risk in a living wall is moisture migration into the building envelope.
The Waterproof Barrier: Specify a secondary layer of protection behind the panels (e.g., EPDM rubber pond liner or a fluid-applied membrane).
Air Gap Requirements: If mounting on drywall or wood, specify the use of horizontal furring strips/sleepers (typically 1.5" deep) to allow airflow behind the panels and prevent mold.
Fasteners: Recommend polymer-coated exterior screws (e.g., Grip-Rite #8 x 1-5/8") to avoid binding with the felt and resisting corrosion.
Irrigation & Drainage System
Florafelt is a "top-down" wicking system. Your specs must reflect this unique behavior.
Irrigation Line: 1/2" or 3/4" drip tubing at the top row only.
Emitter Specs: Two 0.5 GPH (gallons per hour) pressure-compensating emitters per pocket column.
Watering Schedule:
Interior: 24-hour cycle (1–4 mins duration).
Exterior: 2-hour cycles (1–5 mins duration).
Drainage/Collection: Specify a bottom gutter or tray to collect runoff. Note whether it's a "Drain-Away" system (connected to sewer) or a "Recirculating" system (pump and tank).
Plant Material & Planting Method
The "Root Wrap" Method: Specify that plants must be removed from nursery pots, root-wrapped in Florafelt fabric, and tucked into the pockets so they touch the bottom fold (to ensure wicking).
Plant Selection: List plants by botanical name, categorized by light requirements (Foot-candles/Lux).
Soil Type: Use a high-quality, lightweight potting mix; specify that 1/3 of the original soil should be removed to flatten the root ball for the pocket.
Panel Specifications
1. Physical Specifications
2. Material Composition
Growing Medium: 100% Recycled PET (Polyethylene Terephthalate) non-woven synthetic felt.
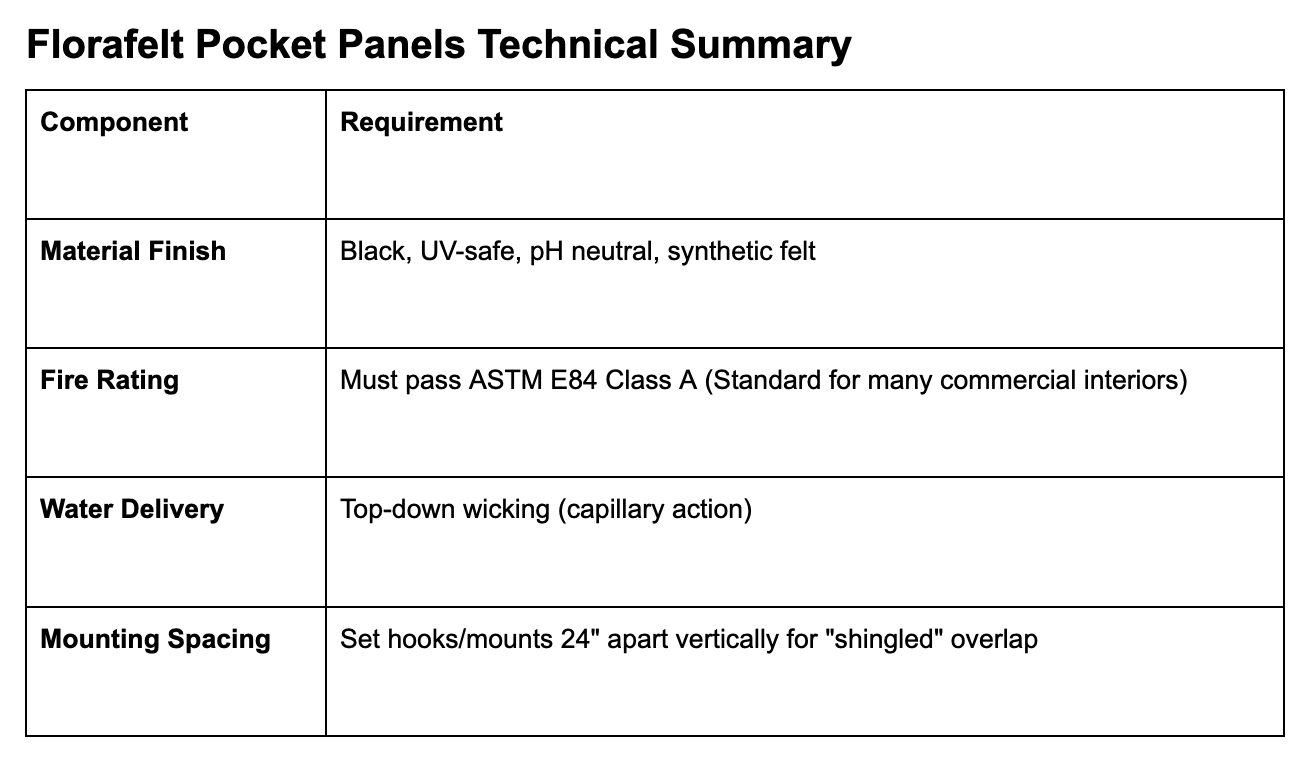
Properties: Indestructible, rot-proof, pH neutral, non-reactive, and UV safe.
Sustainability: Made from recycled plastic water bottles.
Backing Board: Rigid, waterproof HDPE (High-Density Polyethylene) plastic (typically 4mm Coroplast). This prevents moisture from reaching the mounting surface.
Fasteners: Industrial-grade galvanized steel staples.
Hanging Tabs: High-tensile nylon webbing for hook-mounting.
Root Wraps: Included with every panel; made of the same synthetic felt but in a lighter weight for easy wicking and root penetration.
3. Performance & Safety Ratings
Acoustics: Noise Reduction Coefficient (NRC) of 0.66, providing significant sound dampening for interior spaces.
Thermal: Provides supplemental insulation to walls.
Fire Rating: Passes FMVSS 302 (Flammability of Interior Materials); ASTM E84-12 ratings typically show Flame Spread Index 130 and Smoke Developed Index 450.
Health: Hypoallergenic; mildew and odor-resistant; contains no known carcinogens or irritants.
Weathering: No significant loss in strength after 200 hours of accelerated weathering (ASTM G 23).
4. Irrigation & Maintenance
The system is designed to mimic a natural cliffside environment where water flows downward through the medium.
Wicking Action: The felt microfibers distribute water evenly. You typically only need to irrigate the top row of pockets.
Irrigation Setup:
Standard: 1/2" or 3/4" irrigation tubing with button drip emitters (typically 2 emitters per pocket column).
Frequency: Usually 4 times daily for 5–10 minutes (for drain-away systems) or once daily for recirculating systems.
Drainage: Excess water drips from the bottom fold. This can be collected in a drip tray, gutter, or recirculated via a pump and tank.
5. Installation Guidelines
Custom Sizing: Panels can be trimmed using a utility knife and industrial scissors.
Air Gap: For interior drywall or wood walls, a 1.5" air gap is recommended using horizontal sleepers to prevent moisture trap.
Mounting Methods: 1. Hang on Hooks: Using the provided nylon tabs.
2. Permanent Mount: Stainless steel deck screws with washers through the plastic backing into studs or masonry.Shingling: When stacking vertically, the bottom flap of the upper panel must be tucked behind the top flap of the panel below to ensure water flows into the system and not behind it.
Note: Plants are not included with the panels. It is recommended to use "Root Wraps" (included) to stabilize soil and allow for easy "plug-and-play" swapping of plants.
The Mounting & Waterproofing Detail
Proper mounting and waterproofing are the most critical steps in ensuring a long-lasting vertical garden that doesn't damage your structure. Because the Florafelt system relies on a "breathable" felt, managing the moisture behind the panel is key to preventing mold or rot on the host wall.
1. The Waterproof Barrier
While each Florafelt pocket panel comes with a plastic HDPE (High-Density Polyethylene) backing, this is a moisture shield, not a primary waterproof seal for a building.
For Exterior Walls: If mounting on masonry or siding, the HDPE backing is usually sufficient.
For Interior Walls: You must install a secondary waterproof layer. Use 6-mil poly-sheeting or a liquid-applied waterproofing membrane (like RedGard) over the drywall before mounting.
2. Mounting Methods
Depending on your wall type, use one of the following three primary methods:
A. The "Air-Gap" Method (Recommended for Wood/Drywall)
To ensure the wall stays dry, you should create a 1/2" to 1" air gap between the panel and the wall.
Hardware: Use horizontal furring strips (pressure-treated wood or aluminum channels).
Installation: Screw the furring strips into the wall studs, then screw the Florafelt panels into the furring strips. This allows air to circulate behind the HDPE backing, evaporating any condensation.
B. Direct Masonry Mount
Hardware: Stainless steel Tapcon screws and 1" stainless steel fender washers.
Installation: Drill directly into the brick or concrete. Use the washers to prevent the screw head from pulling through the plastic HDPE backing.
C. Hanging (Temporary or Fence Mount)
Hardware: "S" hooks or deck screws.
Installation: Use the nylon webbing tabs at the top of the panel to hang it from a sturdy fence or a horizontal bar.
3. Shingling Detail (Vertical Integration)
When stacking multiple panels vertically to create a large wall, you must follow the shingling principle to prevent water from leaking behind the lower panels.
Overlap: The bottom felt flap of the upper panel must overlap the top edge of the lower panel.
Water Path: This ensures that as water wicks down, it stays within the felt system and "drips" into the pocket below rather than hitting the plastic backing and running behind the system.
4. Drainage and Collection
The bottom of your living wall will always have "runoff" during irrigation. You have two main options:
Drain-Away: Install a standard rain gutter or custom stainless steel tray at the base of the lowest panel. Pitch the gutter to a floor drain or out to a garden bed.
Recirculating: Place a water tank (reservoir) at the base. Use a submersible pump to send the runoff back to the top of the wall.
Pro Tip: Use a 100-micron filter in a recirculating system to prevent felt fibers or soil from clogging your drip emitters.
5. Fastener Specifications
To prevent rust and staining over time, always use the following hardware materials:
Screws: 304 or 316 Stainless Steel.
Washers: 1" Stainless Steel Fender Washers (essential for distributing weight across the HDPE backing).
Wall Anchors: Use toggle bolts for drywall or lead anchors for masonry if studs are not available.
Irrigation & Drainage System
To ensure the longevity of a Florafelt vertical garden, the irrigation system must be designed to mimic a natural "drip and flow" cycle. Because the synthetic felt wicks water vertically and horizontally, the plumbing is relatively simple but requires precision.
1. Irrigation Component Specifications
A professional-grade setup typically uses a top-down saturation method.
Supply Line: 1/2" Polyethylene (PE) tubing or PVC pipe run across the top of the wall.
Emitters: Pressure-compensating (PC) button drip emitters are recommended to ensure even flow regardless of water pressure.
Spacing: One 1/2-GPH (Gallons Per Hour) emitter placed every 6 to 12 inches.
Placement: Emitters should be tucked into the top row of pockets or a dedicated "soaker" felt strip at the very top.
Filtration: A 150-mesh filter is mandatory to prevent sediment from clogging the micro-emitters.
Pressure Regulation: A 25–30 PSI pressure regulator is standard to prevent blowing out the emitter heads.
2. System Types: Drain-Away vs. Recirculating
The drainage strategy depends on whether you have access to a floor drain or a plumbing hookup.
A. Drain-Away (Open Loop)
Connected directly to a building's water supply.
The Setup: An electronic timer or "smart" irrigation controller opens a solenoid valve. Water flows through the panels, and excess is caught in a gutter.
Drainage: The gutter is plumbed directly into a sewer line or directed to exterior landscaping.
Benefit: Low maintenance; no need to monitor water chemistry or refill tanks.
B. Recirculating (Closed Loop)
Used when a floor drain or water line is unavailable (common in offices or lobbies).
The Setup: A reservoir (tank) sits at the base. A submersible pump (e.g., Danner Mag-Drive) pushes water to the top.
Drainage: Gravity pulls the water back down into the reservoir.
Maintenance: Requires weekly water top-offs and monthly nutrient balancing, as the plants will "eat" the minerals in the standing water.
3. The "Micro-Drip" Cycle
Unlike traditional potted plants, Florafelt prefers frequent, short bursts of water. This keeps the felt moist and the air pockets oxygenated.
Indoor Schedule: 1 to 2 times daily for 2–5 minutes.
Outdoor Schedule: 2 to 4 times daily for 5–10 minutes (depending on sun exposure and wind).
The Goal: You want the felt to be "damp-to-the-touch" but not constantly "streaming" water.
4. Drainage Detail & Moisture Control
To protect the floor and the wall from the inevitable runoff, the bottom of the panel must be finished correctly.
Component
Specification
Drip Tray/Gutter
Stainless steel, powder-coated aluminum, or heavy-duty PVC.
Pitch
Minimum 1/8" slope per foot toward the drain hole.
Splatter Shield
An optional 2" return lip on the front of the gutter to catch "splash-back" from the bottom felt fold.
Root Barrier
Ensure the bottom felt flap is tucked inside the gutter to prevent "wicking" water onto the exterior of the tray.
5. Automation & Sensors
For large-scale installations, adding sensors can prevent catastrophic leaks.
Leak Detection: A floor-mounted moisture sensor that can shut off the main water valve if the tray overflows.
Smart Controllers: Systems like Rachio or Rain Bird that adjust watering times based on local humidity and temperature.
Plant Material & Planting Method
The Florafelt system is unique because it uses a soilless-hybrid approach. While the plants can retain some original soil, the system eventually transitions them to a hydroponic-like state where roots grow directly into the synthetic felt.
1. The "Root Wrap" Method
The core of the Florafelt planting method is the Root Wrap. This is a square piece of technical felt (included with panels) used to contain the root ball.
The 4-Step Planting Process:
Preparation: Remove the plant from its plastic nursery pot. Lightly massage the root ball to remove excess loose soil, but do not wash the roots entirely (this prevents transplant shock).
Wrapping: Place the root ball in the center of the Root Wrap. Fold the felt around the roots like a "burrito" or "diaper," leaving the foliage exposed at the top.
Tucking: Insert the wrapped plant into the Florafelt pocket. The wrap should be snug. The felt-to-felt contact allows water to wick from the panel directly into the root zone.
Securing: Use a rubber band or a small staple if the plant is heavy/top-heavy, though the tension of the pocket usually suffices.
2. Plant Selection Criteria
Because the pockets are breathable, plants that prefer high oxygenation at the root zone thrive best.
Interior (Low to Medium Light)
Pothos (Epipremnum aureum): The "gold standard" for living walls; extremely hardy.
Philodendron (Heartleaf): Great for trailing and covering the felt quickly.
Ferns (Staghorn, Bird’s Nest, Button): Thrive in the high-humidity microclimate created by the felt.
Spathiphyllum (Peace Lily): Excellent for air purification and showing visible "thirst" cues.
Exterior (Full Sun to Shade)
Succulents (Sedum, Echeveria): Best for low-water "dry" walls (requires less frequent irrigation).
Heuchera (Coral Bells): Provides incredible color variety.
Carex (Ornamental Grasses): Adds texture and movement.
Edibles: Lettuce, herbs (mint, parsley, chives), and strawberries thrive in the vertical format.
3. Maintenance & Root Migration
Over time, the biology of the wall changes:
Root Penetration: After 3–6 months, roots will grow through the wrap and into the panel's main felt backing. This creates a massive, singular "living mat" that is incredibly stable.
Easy Swapping: If a plant dies or you want to change the design, simply pull the Root Wrap out. If roots have grown into the backing, use a sharp utility knife to slice the small feeder roots; the plant will come out cleanly without damaging the panel structure.
4. Fertilization & Nutrient Delivery
Since the synthetic felt is inert (contains no nutrients), you must provide "food" via the water (Fertigation).
For Drain-Away Systems: Use a Venturi Injector (like a Dosatron) to dilute liquid fertilizer into the main water line.
For Recirculating Systems: Add water-soluble hydroponic nutrients directly into the reservoir tank.
Recommended N-P-K: A balanced, water-soluble 10-10-10 or 20-20-20 formula is usually best for general foliage.
5. Design & Density
Full Coverage: To achieve an "instant" green wall look, use 6-inch plants for a 12-pocket panel.
Growth Room: If you are on a budget, use 4-inch plants and allow 3–4 months for the foliage to grow and hide the felt pockets.
Weight Management: Place heavier, woodier plants (like large Dracaenas) in the bottom pockets and lighter, trailing plants (like Ivy) in the top pockets.
Pro Tip: Always plant from the bottom up. This prevents you from getting dirt on the plants below as you tuck the wraps into the pockets.